آموزش استفاده از پلاگین گردونه شانس در Asp.net core به همراه سورس
سلام دوستان. توی بعضی از سایت ها دیدم که برای قرعه کشی یا دادن کد تخفیف و جوایز از یک گردونه شانس استفاده میشه. یه پروژه Asp net core دارم میخوام از این گردونه استفاده کنم.
لطفا بفرمایید اسم این گردونه شانس چی هست ؟ و چجوری باید از این گردونه استفاده کرد ؟
پاسخ هوش مصنوعی
برای پیاده سازی یک گردونه شانس در پروژه ASP.NET Core، می توانید از پلاگین هایی مانند wheel of fortune یا spin wheel استفاده کنید. این پلاگین ها معمولاً به صورت JavaScript یا jQuery ارایه می شوند.
در اینجا یک مثال ساده از نحوه ی استفاده از پلاگین گردونه شانس به همراه کد نمونه را برای شما آماده کرده ام.
ابتدا باید فایل های لازم را در پروژه تان اضافه کنید:
<link rel="stylesheet" href="https://cdnjs.cloudflare.com/ajax/libs/sweetalert/1.1.3/sweetalert.min.css">
<script src="https://cdnjs.cloudflare.com/ajax/libs/jquery/3.3.1/jquery.min.js"></script>
<script src="https://cdnjs.cloudflare.com/ajax/libs/sweetalert/1.1.3/sweetalert.min.js"></script>
<script src="https://cdnjs.cloudflare.com/ajax/libs/wheelnav/1.3.0/wheelnav.min.js"></script>
سپس در HTML خود می توانید گردونه را به این شکل پیاده سازی کنید:
<div id="myWheel" class="wheelnav"></div>
<button id="spinButton">اسپین کنید</button>
حالا باید کدی برای ایجاد گردونه و اسپین کردن آن بنویسید:
$(document).ready(function() {
    var myWheel = new wheelnav("myWheel");
    myWheel.wheelRadius = 200;
    myWheel.createWheel(["برنده 1", "برنده 2", "برنده 3", "برنده 4"]);

    $("#spinButton").click(function() {
        myWheel.spinWheel();
        swal("شما برنده شدید!", "تبریک!", "success");
    });
});
این کد یک گردونه شانس ساده ایجاد می کند که با کلیک بر روی دکمه "اسپین کنید"، گردونه می چرخد و یک پیام تبریک نمایش داده می شود.
شما می توانید به دلخواه تعداد بخش ها و جوایز را تغییر دهید و استایل گردونه را با CSS سفارشی کنید. امیدوارم این اطلاعات به شما کمک کند!
آموزش استفاده از گردونه شانس در Asp net core
چندین پلاگین جاوااسکریپت هستن که عملکردی مشابه گردونه شانس دارن. مشهورترین اونها پلاگین WinWheel هست که می تونید از خود github هم دانلودش کنید. نحوه استفاده هم خیلی ساده هست.
- ابتدا پلاگین رو از خود github دانلود کنید و در پوشه wwwroot در پوشه lib قرار بدید.
- 2 تا فایل js هست که میتونید توی Layout پروژه خودتون قرار بدید.
 <!--win wheel-->
 <script src="~/lib/winwheel/winwheel.min.js"></script>
 <script src="https://cdnjs.cloudflare.com/ajax/libs/gsap/latest/TweenMax.min.js"></script>
- و یک فایل css هست که اونم در Layout پروژه قرار بدید.
<link href="~/lib/winwheel/static/main.css" rel="stylesheet" />
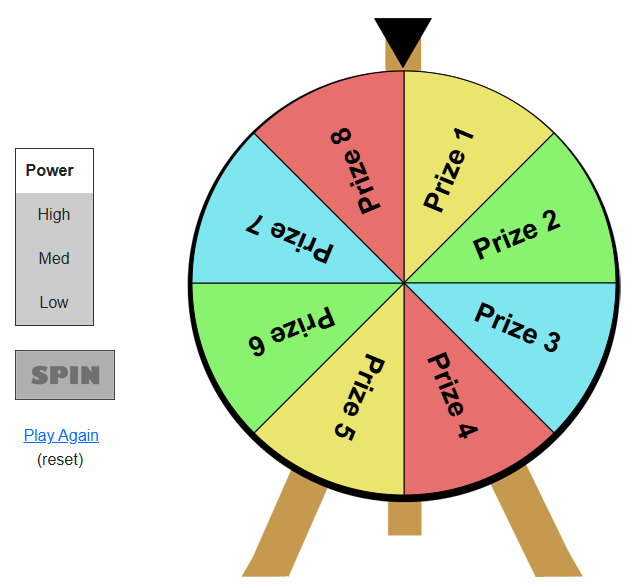
خب حالا یه View بسازید و کدهای زیر رو داخلش کپی کنید.
<div align="center">
<table cellpadding="0" cellspacing="0" border="0">
<tr>
<td>
<div class="power_controls">
<br />
<br />
<table class="power" cellpadding="10" cellspacing="0">
<tr>
<th align="center">Power</th>
</tr>
<tr>
<td width="78" align="center" id="pw3" onClick="powerSelected(3);">High</td>
</tr>
<tr>
<td align="center" id="pw2" onClick="powerSelected(2);">Med</td>
</tr>
<tr>
<td align="center" id="pw1" onClick="powerSelected(1);">Low</td>
</tr>
</table>
<br />
<img id="spin_button" src="~/lib/winwheel/static/spin_off.png" alt="Spin" onClick="startSpin();" />
<br /><br />
<a href="#" onClick="resetWheel(); return false;">Play Again</a><br /> (reset)
</div>
</td>
<td width="438" height="582" class="the_wheel" align="center" valign="center">
<canvas id="canvas" width="434" height="434">
<p style="{color: white}" align="center">Sorry, your browser doesn't support canvas. Please try another.</p>
</canvas>
</td>
</tr>
</table>
</div>
@section Scripts{
<script>
// Create new wheel object specifying the parameters at creation time.
let theWheel = new Winwheel({
'numSegments' : 8, // Specify number of segments.
'outerRadius' : 212, // Set outer radius so wheel fits inside the background.
'textFontSize' : 28, // Set font size as desired.
'segments' : // Define segments including colour and text.
[
{'fillStyle' : '#eae56f', 'text' : 'Prize 1'},
{'fillStyle' : '#89f26e', 'text' : 'Prize 2'},
{'fillStyle' : '#7de6ef', 'text' : 'Prize 3'},
{'fillStyle' : '#e7706f', 'text' : 'Prize 4'},
{'fillStyle' : '#eae56f', 'text' : 'Prize 5'},
{'fillStyle' : '#89f26e', 'text' : 'Prize 6'},
{'fillStyle' : '#7de6ef', 'text' : 'Prize 7'},
{'fillStyle' : '#e7706f', 'text' : 'Prize 8'}
],
'animation' : // Specify the animation to use.
{
'type' : 'spinToStop',
'duration' : 5, // Duration in seconds.
'spins' : 8, // Number of complete spins.
'callbackFinished' : alertPrize
}
});
// Vars used by the code in this page to do power controls.
let wheelPower = 0;
let wheelSpinning = false;
// -------------------------------------------------------
// Function to handle the onClick on the power buttons.
// -------------------------------------------------------
function powerSelected(powerLevel)
{
// Ensure that power can't be changed while wheel is spinning.
if (wheelSpinning == false) {
// Reset all to grey incase this is not the first time the user has selected the power.
document.getElementById('pw1').className = "";
document.getElementById('pw2').className = "";
document.getElementById('pw3').className = "";
// Now light up all cells below-and-including the one selected by changing the class.
if (powerLevel >= 1) {
document.getElementById('pw1').className = "pw1";
}
if (powerLevel >= 2) {
document.getElementById('pw2').className = "pw2";
}
if (powerLevel >= 3) {
document.getElementById('pw3').className = "pw3";
}
// Set wheelPower var used when spin button is clicked.
wheelPower = powerLevel;
// Light up the spin button by changing it's source image and adding a clickable class to it.
document.getElementById('spin_button').src = "/lib/winwheel/static/spin_on.png";
document.getElementById('spin_button').className = "clickable";
}
}
// -------------------------------------------------------
// Click handler for spin button.
// -------------------------------------------------------
function startSpin()
{
// Ensure that spinning can't be clicked again while already running.
if (wheelSpinning == false) {
// Based on the power level selected adjust the number of spins for the wheel, the more times is has
// to rotate with the duration of the animation the quicker the wheel spins.
if (wheelPower == 1) {
theWheel.animation.spins = 3;
} else if (wheelPower == 2) {
theWheel.animation.spins = 8;
} else if (wheelPower == 3) {
theWheel.animation.spins = 15;
}
// Disable the spin button so can't click again while wheel is spinning.
document.getElementById('spin_button').src = "/lib/winwheel/static/spin_off.png";
document.getElementById('spin_button').className = "";
// Begin the spin animation by calling startAnimation on the wheel object.
theWheel.startAnimation();
// Set to true so that power can't be changed and spin button re-enabled during
// the current animation. The user will have to reset before spinning again.
wheelSpinning = true;
}
}
// -------------------------------------------------------
// Function for reset button.
// -------------------------------------------------------
function resetWheel()
{
theWheel.stopAnimation(false); // Stop the animation, false as param so does not call callback function.
theWheel.rotationAngle = 0; // Re-set the wheel angle to 0 degrees.
theWheel.draw(); // Call draw to render changes to the wheel.
document.getElementById('pw1').className = ""; // Remove all colours from the power level indicators.
document.getElementById('pw2').className = "";
document.getElementById('pw3').className = "";
wheelSpinning = false; // Reset to false to power buttons and spin can be clicked again.
}
// -------------------------------------------------------
// Called when the spin animation has finished by the callback feature of the wheel because I specified callback in the parameters
// note the indicated segment is passed in as a parmeter as 99% of the time you will want to know this to inform the user of their prize.
// -------------------------------------------------------
function alertPrize(indicatedSegment)
{
// Do basic alert of the segment text. You would probably want to do something more interesting with this information.
alert("You have won " + indicatedSegment.text);
}
</script>
}
بعد از اجرا گردونه کار میکنه. سورس این کار هم در دات نت 9 براتون آماده کردم میتونید دانلود و استفاده کنید.
- خطای Severity Code Description Project هنگام استارت پروژه
- کار نکردن navBar و sideBar در پروژه Asp.net core
- خطا موقع استفاده از Api در سی شارپ
- آموزش استفاده از پلاگین گردونه شانس در Asp.net core به همراه سورس
- نمایش متن به صورت فرمت شده در CkEditor
- آموزش استفاده از SignalR در Asp.net Core با مثال عملی
- ادغام چند گزارش استیمول سافت بصورت پی دی اف در یک فایل
- نحوه تغییر استایل کامپوننت select2 چگونه است ؟
- چگونه امنیت پروژه را در Asp.net Core افزایش دهیم ؟
- ارسال پارامتر در دستور window.open جی کویری
- کار با CkEditor با قابلیت آپلود عکس
- خطا در ایجاد migration در Asp.net core
- تفاوت های Asp.net core و Asp.net mvc چیه؟
- دلیل اسپم شدن ایمیل های ارسالی از سرور
- نحوه لایه بندی پروژه Core و اضافه کردن به IIS
- ارسال ایمیل در Asp.net core
- آیا میشه در mvc core از کامپونت استفاده کرد
- آپلود فایل در Asp.net core چگونه است؟
- حذف کامل یک رکورد در جدول ریلیشن شده
- اشکال در آپلود فایل ویدیو در mvc core 2